添加依赖
如果需要给项目添加依赖,只需要在pom.xml的<dependencies>节点下添加相关依赖就可以。
1
2
3
4
5
6
7
| <dependencies>
<dependency>
<groupId>org.javassist</groupId>
<artifactId>javassist</artifactId>
<version>3.24.0-GA</version>
</dependency>
</dependencies>
|
scope 值有 compile、provided、runtime、system、test、import。默认为compile。
provided
对于开始时需要的依赖,而在运行时运行环境已经提供了的依赖,就需要额外的指定scope为provided。这样在打包时就不会把依赖打包在内。
1
2
3
4
5
6
| <dependency>
<groupId>javax.servlet</groupId>
<artifactId>javax.servlet-api</artifactId>
<version>3.0.1</version>
<scope>provided</scope>
</dependency>
|
runtime
在运行的时候才会依赖,在编译的时候不会依赖。比较典型的场景是JDBC driver 和 DataSource 连接池。开发的时候没办法直接调用相关的类但是运行的时候又存在。
1
2
3
4
5
6
| <dependency>
<groupId>com.alibaba</groupId>
<artifactId>druid</artifactId>
<version>1.2.6</version>
<scope>runtime</scope>
</dependency>
|
system
有些jar包,nexus 公共库没有,而我们由于各种原因不想使用私服,我们可以指定scope为system, 然后配合systemPath指定jar位置。
1
2
3
4
5
6
7
| <dependency>
<groupId>org.xobo.local</groupId>
<artifactId>myartifact</artifactId>
<version>1.0.0</version>
<scope>system</scope>
<systemPath>${pom.basedir}/lib/myartifact_1.0.0.jar</systemPath>
</dependency>
|
同时需要配置includeSystemScope属性
1
2
3
4
5
6
7
| <plugin>
<groupId>org.springframework.boot</groupId>
<artifactId>spring-boot-maven-plugin</artifactId>
<configuration>
<includeSystemScope>true</includeSystemScope>
</configuration>
</plugin>
|
pom.basedir表示项目根目录,即包含pom.xml文件的目录。 还有一个更老的写法basedir、project.basedir 已经被标记为弃用了。
Maven Model Builder – Introduction https://maven.apache.org/ref/3-LATEST/maven-model-builder/index.html
test
在测试范围有效,在编译与打包的时候都不会使用这个依赖。
1
2
3
4
5
6
| <dependency>
<groupId>junit</groupId>
<artifactId>junit</artifactId>
<version>4.13.2</version>
<scope>test</scope>
</dependency>
|
管理版本依赖
使用 dependencyManagement 管理Jar包版本。dependencyManagement 只是一个针对依赖的声明,并不真正的添加依赖。等真正添加依赖时,可以为这些依赖的某些属性提供默认值,比如版本号。 Java项目中三方Jar包非常的丰富,丰富的同时带来了依赖的混乱,通过 dependencyManagement 可以快速的统一 Jar 包版本。 以 javassist 为例,项目中依赖多个 javassist 版本。 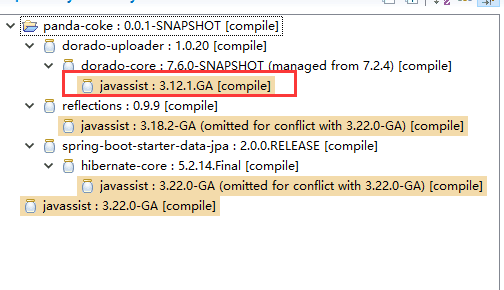 在 pom.xml 增加以下代码
1
2
3
4
5
6
7
8
9
10
11
12
13
14
15
| <dependencies>
<dependency>
<groupId>org.javassist</groupId>
<artifactId>javassist</artifactId>
</dependency>
</dependencies>
<dependencyManagement>
<dependencies>
        <dependency>
            <groupId>org.javassist</groupId>
            <artifactId>javassist</artifactId>
            <version>3.24.0-GA</version>
        </dependency>
</dependencies>
</dependencyManagement>
|
这个时候 javassist 就会被统一成 3.24.0-GA 版本了,但是还有一个漏网之鱼。 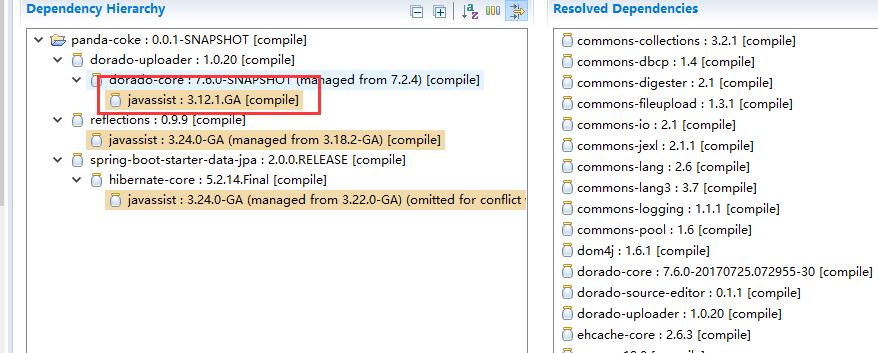 这是因为 javassist 从 3.13.x 开始变了 groupId。 我们需要单独排除这个依赖。
 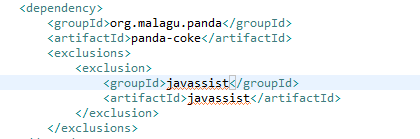 这样 javassist 的版本就彻底的统一了。
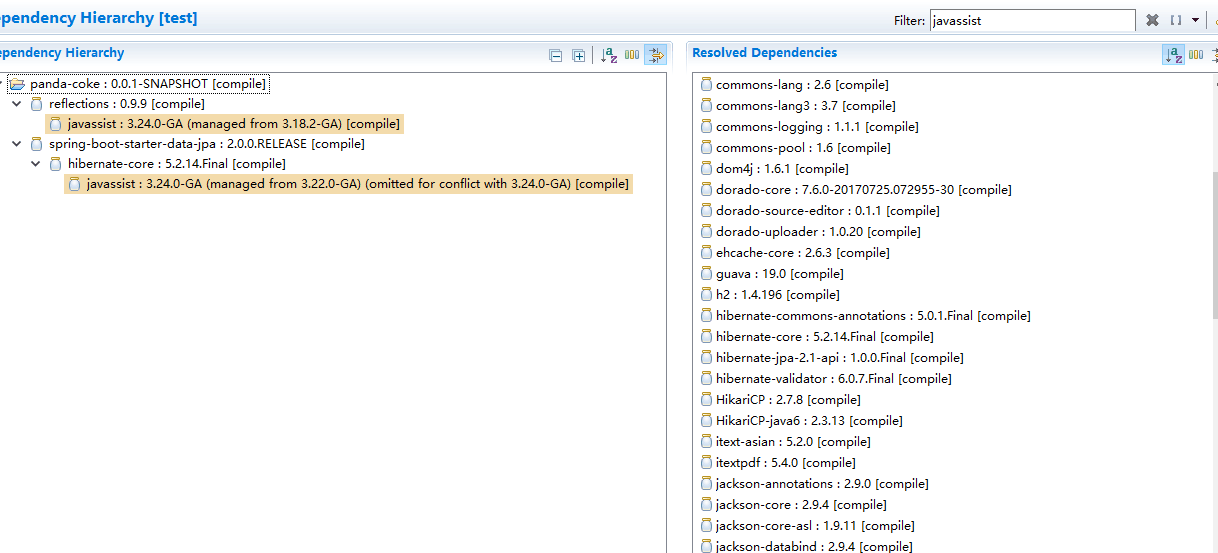
生成 source 和 doc
如果希望在 package install 或 deploy时自动生成.需要给 pom.xml 的 repositories 节点添加如下配置:
1
2
3
4
5
6
7
8
9
10
11
12
| <plugin>
<groupId>org.apache.maven.plugins</groupId>
<artifactId>maven-source-plugin</artifactId>
<executions>
<execution>
<id>attach-sources</id>
<goals>
<goal>jar</goal>
</goals>
</execution>
</executions>
</plugin>
|
本地 jar 包
0x01. 上传至 Maven 私服(nexus)。 0x02. 创建项目内 Maven 库。 1 给 pom.xml 的 repositories 节点添加如下配置:
1
2
3
4
| <repository>
<id>project</id>
<url>file://${project.basedir}/repo</url>
</repository>
|
2 执行如下命令
1
2
3
| mvn install:install-file -DlocalRepositoryPath=repo -DcreateChecksum=true \
-Dpackaging=jar -Dfile=[your-jar] -DgroupId=[...] \
-DartifactId=[...] -Dversion=[...]
|
也可以使用该脚本自动解析 jar 包名称并安装到项目 repo install-to-project-repo
指定 JDK 版本
可以通过属性配置
1
2
3
4
5
| <properties>
<maven.compiler.source>1.8</maven.compiler.source>
<maven.compiler.target>1.</maven.compiler.target>
<maven.compiler.compilerVersion>1.8</maven.compiler.compilerVersion>
</properties>
|
也可以给 pom.xml 的 build 节点添加如下配置
1
2
3
4
5
6
7
8
9
10
11
12
13
| <build>
<plugins>
<plugin>
<groupId>org.apache.maven.plugins</groupId>
<artifactId>maven-compiler-plugin</artifactId>
<version>3.7.0</version>
<configuration>
<source>1.7</source>
<target>1.7</target>
</configuration>
</plugin>
</plugins>
</build>
|
最终版pom.xml
pom 的依赖是一棵树,单纯看一个pom.xml什么也看不出来这个时候我们就需要打印出依赖树:
pom.xml不仅仅是依赖,还是涉及到各个配置之间的继承覆盖,这个时候就需要查看最终的pom.xml, 在pom.xml所在的目录执行命令:
这样就可以输出一个完整的 pom.xml。 如果希望能输出到一个xml文件里:
1
| mvn help:effective-pom -Doutput=all.xml
|
pom.xml 片段
My pom.xml
1
2
3
4
5
6
7
8
9
10
11
12
13
14
15
16
17
18
19
20
21
22
23
24
25
26
27
28
29
30
31
32
33
34
35
36
37
38
39
40
41
42
43
44
45
46
47
48
49
50
51
52
53
54
55
56
57
58
59
60
61
62
63
64
65
66
67
68
69
70
71
72
73
74
75
76
77
78
79
80
81
82
83
84
85
86
87
88
89
90
91
92
93
94
95
96
97
98
99
100
101
102
103
104
105
106
107
108
109
110
111
112
113
114
115
116
117
118
119
120
121
122
| <project xmlns="http://maven.apache.org/POM/4.0.0" xmlns:xsi="http://www.w3.org/2001/xmlSchema-instance"
xsi:schemaLocation="http://maven.apache.org/POM/4.0.0 http://maven.apache.org/xsd/maven-4.0.0.xsd">
<modelVersion>4.0.0</modelVersion>
<!-- groupId 统一为域名倒序, 可以加子域但不要自创域名。 -->
<groupId>org.xobo</groupId>
<artifactId>maven-pom-sample</artifactId>
<version>0.0.1-SNAPSHOT</version>
<name>maven-pom-sample</name>
<url>http://www.ezhiyang.com</url>
<properties>
<!-- 统一属性, 可根据实际情况修改 -->
<project.build.sourceEncoding>UTF-8</project.build.sourceEncoding>
<maven.compiler.source>1.7</maven.compiler.source>
<maven.compiler.target>1.7</maven.compiler.target>
<!-- jar包版本属性, 属性值建议命名为 artifactId.version -->
<commons-dubbo-api.version>0.0.11-SNAPSHOT</commons-dubbo-api.version>
<sendcloud-sdk.version>1.0.0</sendcloud-sdk.version>
</properties>
<dependencies>
<dependency>
<groupId>org.xobo.3rd</groupId>
<artifactId>sendcloud-sdk</artifactId>
</dependency>
<dependency>
<groupId>org.xobo</groupId>
<artifactId>commons-dubbo-api</artifactId>
</dependency>
</dependencies>
<!-- 使用 dependencyManagement 统一项目 jar 包版本 -->
<dependencyManagement>
<dependencies>
<dependency>
<groupId>org.xobo</groupId>
<artifactId>commons-dubbo-api</artifactId>
<version>${commons-dubbo-api.version}</version>
</dependency>
<!-- 手动上传至 nexus 的 jar 包,groupId 固定为 org.xobo.3rd -->
<dependency>
<groupId>org.xobo.3rd</groupId>
<artifactId>sendcloud-sdk</artifactId>
<version>${sendcloud-sdk.version}</version>
</dependency>
</dependencies>
</dependencyManagement>
<build>
<resources>
<!-- 打包的时候把 xml 等文件打入 jar 包, 可根据实际项目需要增删条目 -->
<resource>
<directory>src/main/resources</directory>
<includes>
<include>**/*.xml</include>
<include>**/*.html</include>
<include>**/*.xsd</include>
<include>**/*.schemas</include>
<include>**/*.handlers</include>
<include>**/*.properties</include>
<include>**/*.png</include>
<include>**/*.jpg</include>
<include>**/*.gif</include>
<include>**/*.css</include>
<include>**/*.js</include>
<include>**/*.bpmn</include>
<include>**/*.bpmn2</include>
</includes>
</resource>
<resource>
<directory>src/main/java</directory>
<includes>
<include>**/*.xml</include>
<include>**/*.html</include>
<include>**/*.xsd</include>
<include>**/*.schemas</include>
<include>**/*.handlers</include>
<include>**/*.properties</include>
<include>**/*.png</include>
<include>**/*.jpg</include>
<include>**/*.gif</include>
<include>**/*.css</include>
<include>**/*.js</include>
<include>**/*.bpmn</include>
<include>**/*.bpmn2</include>
</includes>
</resource>
</resources>
</build>
<!-- 使用私有 nexus 服务器, 根据实际情况修改或删除 -->
<repositories>
<repository>
<id>ezhiyang</id>
<url>http://localhost:8081/nexus/content/groups/public/</url>
</repository>
</repositories>
<pluginRepositories>
<pluginRepository>
<id>ezhiyang</id>
<url>http://localhost:8081/nexus/content/groups/public/</url>
</pluginRepository>
</pluginRepositories>
<distributionManagement>
<repository>
<id>ezhiyang-deployment</id>
<url>http://localhost:8081/nexus/content/repositories/releases</url>
</repository>
<snapshotRepository>
<id>ezhiyang-deployment</id>
<url>http://localhost:8081/nexus/content/repositories/snapshots</url>
</snapshotRepository>
</distributionManagement>
</project>
|
BDF2’s dependencyManagement